
Yeah, I built a CNC mill and a 3D printer based on Arduino boards and A4988 stepper drivers, but I always followed instructions and used prebuilt reprap firmware. I never understood how the stepper drivers work and how the Arduino has to be programmed. I found a really useful post. It turned out it is a piece of cake to make it work.
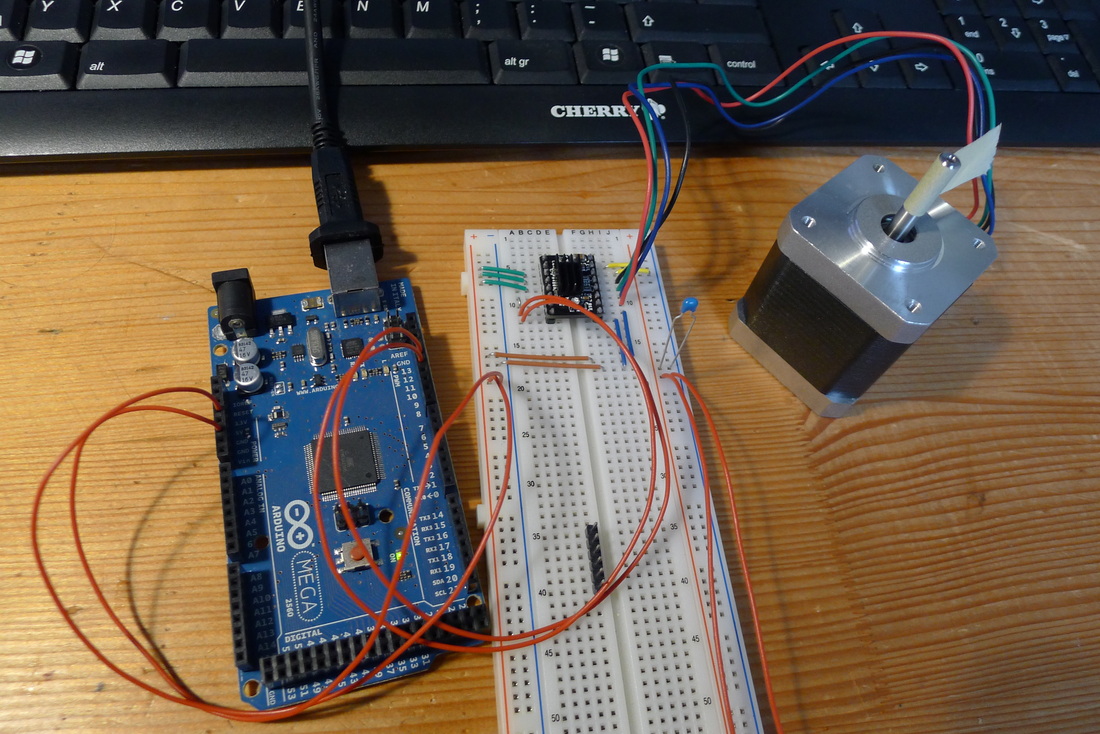
First I wired up everything as shown on the image. On the right side of my breadboard I have 9V DC from a external power supply while on the left side I connected the 3.3V and GND from the Arduino Mega for logic signals. To find out which wires from the motor belong together I just measured the resistance between the different wires and then checked some images on Google to make sure I made no mistake. I connected the step to pin 13 and dir to pin 12 on my Arduino. Just make sure you use digital pins here and remember to change the program. Finally I uploaded the sample code and it worked.
Ok, now to the explanation of the code. Standard stepper motors have 200 full steps per revolution. If you send one pulse, the motor will make one step / turn by 1.8°. To make a step just write to the step pin first high and then low (one pulse). If you repeat this the motor will make a more or less smooth turn. If you decrease the delay between the pulses, the motor will turn faster. If you increase it, it will turn slower. The direction of the stepper can be switched just by setting the dir pin high or low -> digitalWrite(dir, HIGH); . For smoother movement, steppers can be run in microstepping mode. The original 200 steps can be divided into smaller steps, for example "half step" means it will have 400 steps per revolution. To enable this on the A4988 you can set the MS1, MS2 and MS3 pins high or low according to the datasheet page 6. As you can see on my image (green bridges), I set all the pins high which means sixteenth step or 200x16 = 3200 steps per revolution (0.1125°/step). If you now run it with the same delays you had before, the rotation will be much slower but even smoother.
If you run your stepper really fast, you will recognize hard direction changes. This can be avoided by using acceleration and deceleration. I was too lazy to program it by myself and so I found the AccelStepper library. After some research and try & error it worked without hard direction changes but still very fast. Another nice feature of this library is the ability to easily use multiple steppers. This will be very useful if you want to make some kind of CNC or vehicle with two or more motors.
My AccelStepper Sample Code:
#include <AccelStepper.h>
AccelStepper Stepper1(1,13,12); //use pin 12 and 13 for dir and step, 1 is the "external driver" mode (A4988)
int dir = 1; //used to switch direction
void setup() {
Stepper1.setMaxSpeed(3000); //set max speed the motor will turn (steps/second)
Stepper1.setAcceleration(13000); //set acceleration (steps/second^2)
}
void loop() {
if(Stepper1.distanceToGo()==0){ //check if motor has already finished his last move
Stepper1.move(1600*dir); //set next movement to 1600 steps (if dir is -1 it will move -1600 -> opposite direction)
dir = dir*(-1); //negate dir to make the next movement go in opposite direction
delay(1000); //wait 1 second
}
Stepper1.run(); //run the stepper. this has to be done over and over again to continously move the stepper
}
 RSS Feed
